
AI Generated Summary By Geek Bot 🤖
Why?
Because every byte costs energy. And energy (usually) means carbon.
“If you can measure it, you can reduce it.”
💻 How It Works:
- Measures total resource size on load using the
performance.getEntriesByType("resource")API. - Uses the formula:
pageSizeMB × 0.8g = estimated CO₂ per visit - Renders a dynamic badge right on your site.
🛠 Drop-in Integration:
Works anywhere:
- ✅ HTML/PHP
- ✅ WordPress (via
functions.php) - ✅ Flask/Django (
base.html) - ✅ Node.js/Express (with header injection)
- ✅ React (simple badge component)
📎 Bonus Suggestions:
- Add a Tooltip or Modal explaining what the number means.
- Color-code the badge: Green (low), Yellow (moderate), Red (heavy).
- Cache result for returning visitors to avoid recalculating.
- Track emission trends via analytics (e.g., over time or per route).
- Encourage a “green page size” goal — < 1MB if possible!
🌍 Why Show a CO₂ Emission Estimate?
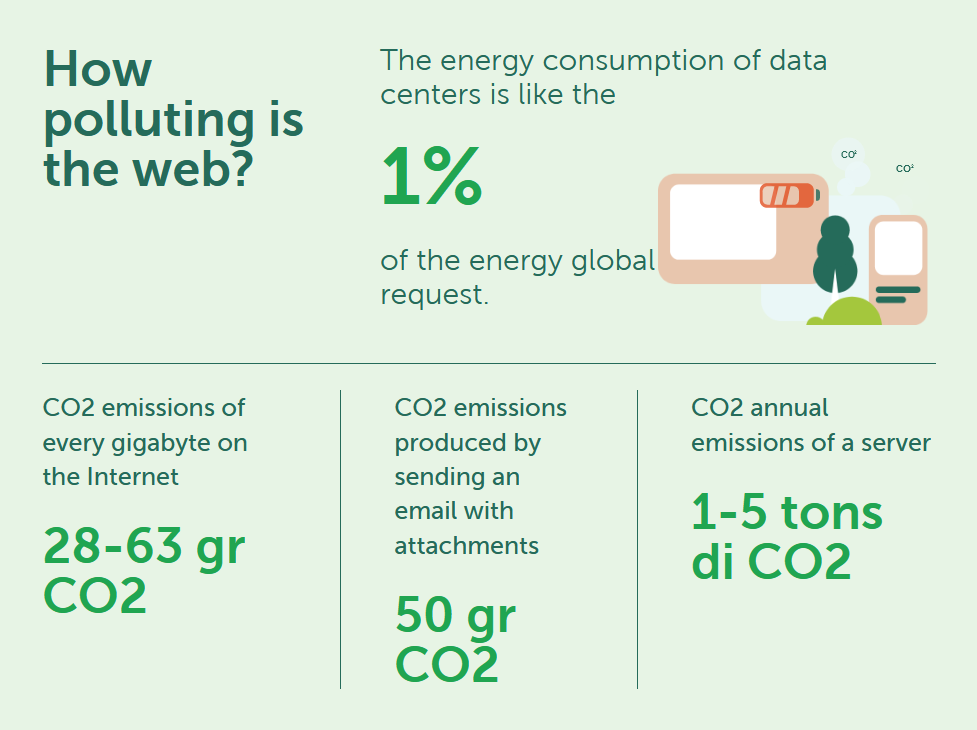
The internet feels invisible, but it has a very real carbon footprint. Every click, scroll, and video stream uses electricity—often from fossil fuel-powered sources. In fact, the internet is responsible for around 3.7% of global greenhouse gas emissions, putting it ahead of the aviation industry in terms of environmental impact. And this figure is only expected to grow.
💡 Where Do Emissions Come From?
1. 🖥️ Data Centers
These are the digital factories of the internet. Data centers store and process everything from websites to cat videos. They run 24/7, consuming vast amounts of power not just for computation, but also for cooling, backup systems, and redundancy. Even idle servers consume energy.
2. 🌐 Network Infrastructure
Every byte of data travels across a network of routers, switches, fiber-optic cables, mobile towers, and satellites. These systems consume enormous electricity to keep global traffic flowing seamlessly.
3. 📱 End-User Devices
When a user loads your site, their device (laptop, phone, or tablet) uses power to download, render, and display your content. Higher page weights mean longer load times and more energy used.
🎯 Why Show a Badge on Your Website?
Adding a CO₂ emissions estimate badge is a simple way to:
- Educate visitors about the hidden energy costs of digital content
- Encourage developers and teams to optimize page size and performance
- Demonstrate environmental responsibility and transparency
- Differentiate your brand as eco-aware and conscious
📊 How Much Is 0.8g of CO₂?
The 0.8g per MB figure is a conservative estimate based on multiple studies (e.g., The Shift Project, Green Web Foundation). It includes:
- Power consumption during data transmission
- Energy used by data centers
- Electricity used by end-user devices (averaged globally)
⚙️ How It Works
To calculate the carbon footprint of a webpage, we’ll estimate the page size in megabytes and multiply it by a standard emission factor—0.8 grams of CO₂ emission per megabyte. This gives us a rough idea of the energy impact every time someone loads your site.
Using just a few lines of JavaScript, we’ll dynamically:
- Measure your webpage’s total resource size,
- Estimate the CO₂ emissions,
- Display it live as a badge in the corner of the page.
The best part?
✅ No external APIs
✅ No frameworks or dependencies
✅ Works on any website—whether you use WordPress, plain HTML, PHP, Flask, Django, or React.
🌍 See It in Action!

Curious how the carbon counter works? 👉 Check out the live example to see real-time CO₂ emissions estimated from page size and resource usage. P.S. We’ve implemented this counter in the footer of our own site — scroll down on GeekCircuit.com to see it in action!
You can also download the example and explore the code on GitHub here:
GitHub Repo: Carbon Counter Example
Let’s get started with the setup! 🌱
🌿 Static Badge Format (No JavaScript)
This is ideal if you want a simple display without real-time calculation. Just estimate your page size manually (e.g., 500 KB = 0.4g CO₂ emission using 0.8g/MB) and display it directly in your HTML.
<span id="carbon-output">
  <abbr title="Carbon Dioxide">CO₂</abbr> emitted: <strong>0.4g</strong> per visit
</span>
🚀 JavaScript Integration
Paste this before </body>:
<script>
window.addEventListener("load", function () {
  const entries = performance.getEntriesByType("resource");
  let totalBytes = entries.reduce((sum, res) => sum + res.transferSize, 0);
  let totalMB = totalBytes / (1024 * 1024);
  let estimatedCO2 = (totalMB * 0.8).toFixed(2);
  const span = document.getElementById("carbon-output");
  if (span) {
    span.innerHTML = `${estimatedCO2} g of <abbr title="Carbon dioxide equivalent">CO<sub>2</sub></abbr> emitted (est.)`;
  }
});
</script>
🌐 Platform Integration Examples
💻 WordPress Integration
To display a live CO₂ emission badge across all pages on your WordPress site, you can easily add a small script in your theme’s functions.php file. This method ensures the badge appears site-wide without needing to edit individual posts or templates.
🛠️ Steps:
Open functions.php:
Go to your WordPress Dashboard → Appearance → Theme File Editor → Select functions.php from the sidebar.
Add the following code:
function estimate_carbon_emission() {
  ?>
  <script>
window.addEventListener("load", function () {
  const entries = performance.getEntriesByType("resource");
  let totalBytes = entries.reduce((sum, res) => sum + res.transferSize, 0);
  let totalMB = totalBytes / (1024 * 1024);
  let estimatedCO2 = (totalMB * 0.8).toFixed(2);
  const span = document.getElementById("carbon-output");
  if (span) {
    span.innerHTML = `${estimatedCO2} g of <abbr title="Carbon dioxide equivalent">CO<sub>2</sub></abbr> emitted (est.)`;
  }
});
</script>
  <?php
}
add_action('wp_footer', 'estimate_carbon_emission');
Now, add a placeholder where the CO₂ emission output will appear. Open your theme’s footer.php file (or any location near the bottom of your page where you’d like the badge to be displayed) and insert the following line:
<span id="carbon-output"></span></body> tag to ensure it loads after the page content. This span will be dynamically populated by the JavaScript we add next.🔧 PHP Page Integration
If you’re using a plain .php file (not a CMS like WordPress), here’s how to add the live CO₂ emission badge in just a few steps:
1. 🧱 Add the Output Container
Paste this HTML where you want the badge to appear—usually in the footer or sidebar:
<span id="carbon-output"></span>2. 🚀 Add the JavaScript
Place this script just before the closing </body> tag in your .php file:
<script>
window.addEventListener("load", function () {
  const entries = performance.getEntriesByType("resource");
  let totalBytes = entries.reduce((sum, res) => sum + res.transferSize, 0);
  let totalMB = totalBytes / (1024 * 1024);
  let estimatedCO2 = (totalMB * 0.8).toFixed(2);
  const span = document.getElementById("carbon-output");
  if (span) {
    span.innerHTML = `${estimatedCO2} g of <abbr title="Carbon dioxide equivalent">CO<sub>2</sub></abbr> emitted (est.)`;
  }
});
</script>
🐍 Python (Flask/Django)
Whether you’re using Flask or Django, follow these steps to show a live CO₂ emission badge based on page size:
1. 🧱 Add the Output Badge in Your Template
Insert this where you want the badge to appear (usually in base.html or footer.html):
<span id="carbon-output"></span>2. 🚀 Add JavaScript Before </body>
Just before the closing </body> tag in your base template (e.g., base.html), include the following:
<script>
  document.addEventListener("DOMContentLoaded", function () {
    const bytes = performance.getEntriesByType("navigation")[0]?.transferSize || 0;
    const kilobytes = bytes / 1024;
    const gramsCO2 = (kilobytes / 1024) * 0.8;
    const rounded = gramsCO2.toFixed(2);
    document.getElementById("carbon-output").innerHTML = `🌱 Estimated CO₂: <abbr title="grams of carbon dioxide">${rounded}g</abbr> per visit`;
  });
</script>
🌐 Static HTML
This method is super simple and works on any basic HTML page—no backend required, no libraries, no APIs. Just copy and paste this code in you <body> tag:
<body>
 ....
 <span id="carbon-output"></span>
 <script>
   window.addEventListener("load", function () {
   const entries = performance.getEntriesByType("resource");
   let totalBytes = entries.reduce((sum, res) => sum + res.transferSize, 0);
   let totalMB = totalBytes / (1024 * 1024);
   let estimatedCO2 = (totalMB * 0.8).toFixed(2);
   const span = document.getElementById("carbon-output");
   if (span) {span.innerHTML = `${estimatedCO2} g of <abbr title="Carbon dioxide equivalent">CO<sub>2</sub></abbr> emitted (est.)`;}
   });
</script>
</body>
🛠️ Node.js (Express.js)
You can estimate and display CO₂ emissions per page load using Express middleware and a small script in your layout file.
1. 📦 Create Middleware to Inject Size Header
In your app.js or server.js file:
// Add this middleware early in the stack
app.use((req, res, next) => {
  let send = res.send;
  res.send = function (body) {
    const sizeInBytes = Buffer.byteLength(body);
    res.setHeader('X-Page-Size', sizeInBytes);
    send.call(this, body);
  };
  next();
});
This sets a custom X-Page-Size header based on the size of the response.
2. 🧱 Add Output Element in Your Template
In your layout file (e.g., views/layout.ejs, layout.pug, etc.), add this where you want the badge:
<span id="carbon-output"></span>3. 🚀 Add Script Before </body>
This JavaScript fetches the header and estimates CO₂:
<script>
  document.addEventListener("DOMContentLoaded", function () {
    fetch(window.location.href, { method: 'HEAD' })
      .then(res => {
        const size = res.headers.get("X-Page-Size") || 0;
        const kb = size / 1024;
        const grams = (kb / 1024) * 0.8;
        const display = grams.toFixed(2);
        document.getElementById("carbon-output").innerHTML =
          `🌱 Estimated CO₂: <abbr title="grams of carbon dioxide">${display}g</abbr> per visit`;
      });
  });
</script>
⚛️ React
React apps are usually single-page applications (SPA), so page load happens once and the bundle size remains fairly consistent. We’ll estimate CO₂ emissions using your bundle size and display it via a simple component.
1. ✅ Create the CarbonBadge Component
// CarbonBadge.jsx
import React from 'react';

const CarbonBadge = ({ bundleSizeInKB = 300 }) => {
  const grams = (bundleSizeInKB / 1024) * 0.8;
  const display = grams.toFixed(2);

  return (
    <span id="carbon-output" style={styles.badge}>
      🌱 Estimated CO₂: <abbr title="grams of carbon dioxide">{display}g</abbr> per visit
    </span>
  );
};

const styles = {
  badge: {
    display: 'inline-block',
    backgroundColor: '#fef9c3',
    color: '#854d0e',
    padding: '6px 10px',
    fontSize: '14px',
    borderLeft: '4px solid #eab308',
    borderRadius: '4px',
    marginTop: '1em',
    fontFamily: 'sans-serif',
  }
};

export default CarbonBadge;2. ✅ Use It in Your App
// App.jsx or wherever you want to show the badge
import CarbonBadge from './CarbonBadge';

function App() {
  return (
    <div className="App">
      {/* your content */}
      <CarbonBadge bundleSizeInKB={300} />
    </div>
  );
}
To go beyond static estimation, you could dynamically fetch bundle.js size using fetch and content-length from headers, but most hosts block CORS headers from static assets. So static estimate is more reliable and simpler.
🎨 Optional Styling
To make your CO₂ emission badge visually appealing and ensure it fits well on your website without disrupting the user experience, you can add some custom CSS styles.
Here’s a simple CSS snippet you can add to your website’s stylesheet (or inside a <style> block) to position the badge fixed at the bottom right corner, with a clean background and readable text:
#carbon-output {
  position: fixed;
  bottom: 1rem;
  right: 1rem;
  background: #e6ffe6;
  color: #1b5e20;
  padding: 8px 12px;
  border-radius: 8px;
  font-size: 14px;
  box-shadow: 0 0 5px rgba(0,0,0,0.15);
}
🌟 Final Thoughts
Every website, no matter how small, contributes to carbon emissions. By adding a live CO₂ emission badge, you’re not just displaying a number—you’re starting a conversation. This small visual cue helps raise awareness, fosters greener digital habits, and signals to your visitors that you care about sustainability.
Best of all, this method is lightweight, privacy-respecting, and works on any platform—no external APIs, no dependencies, just clean, open code.
💬 If this guide helped you make a small impact, consider sharing it with others.
We’d love to hear your thoughts or suggestions—drop a comment or send feedback and let’s build a more sustainable web, together. 🌱